The Maker Movement has crept into the consciousness of schools in the past few years. For some, it's a wake-up call that over-tested, over-scheduled young people are not going to become the creative, enthusiastic learners we all hope to nurture. For others, it's a personal reconnection to our collective, deeply-felt human impulses to create, invent and shape the world. Makerspaces can help make these ideas come to life in classrooms, libraries, museums and community centers. But how do we design spaces and activities that support these new learning ideals?
Who wants a makerspace?
The best reason to create a makerspace is to give young people exciting hands-on, minds-on learning opportunities. The worst reason is that it's trendy and everyone else is doing it. Embarking on a journey to add education-focused making and makerspaces calls on educators to rethink some traditional school structures. We know much is lost when math is divorced from science and art, and students are ranked and sorted as winners and losers based solely on multiple-choice tests. Why do we ring a bell every 42 minutes to move abruptly to a new class and then complain that students have short attention spans? Makerspaces offer an alternate vision of students engaged in meaningful long-term projects as they grapple with the big ideas and messy reality behind the subjects we teach them. It is not just about a new coat of paint and a shopping spree while everything else stays the same.
It is wishful thinking to hope that a makerspace alone can solve problems caused by separated subjects, not enough time and test-driven curriculum. That said, designing a makerspace can be a vehicle for expressing some of those hopes in a concrete way. What we believe becomes what we do and what we do becomes reality.
Where to start
The best place to start a makerspace design is to create shared understanding with all stakeholders of both the "what" and the "why".
Some "why" questions to answer:
- Why do we need a new space? What will happen here that won't happen in classrooms, labs, shops, art rooms and vice versa?
- Why do we think this is a good use of time and money?
Some "what" questions to answer:
- What will happen in the space?
- What habits and culture do we want to build upon? What do we want to change?
- What are our values and expectations for the space and student experience, both long and short term?
- What will success look like?
The space design, the tools and materials inside the space, and the use plan for the new space should all come from the answers to these questions. For every school in every community the answers will be unique. It would be easier if you could just download a set of blueprints and a shopping list and be done with it! However, if you jump into designing space or purchasing equipment without asking and answering some important questions, your plan will be rudderless.
Many times, when designing new learning spaces it is assumed that the culture will transform as well. Just because you build a flexible space with terrific materials, it won't be magically be filled with wonderful student-centered, open-ended projects. You have to say out loud what you want and then make it happen.
Who to include
Change theory says that to be effective, all stakeholders must be involved in the process. This is obviously a good time to include teachers, administrators, district officials, community members and politicians - but don't forget about students. Students should be invited to be on planning committees in real, not token roles. Students can be involved in brainstorming design and functionality. Student participation is more than just tokenism, they are the prime stakeholders for the promise of educational change. Try to include all sorts of students, not just "the usual suspects."
Everyone may not be on board at first, but it's crucial to come to consensus on shared expectations. Be clear while making your case that, although your plans may not look exactly like traditional school, you are not abandoning high standards or a quest for learning. The argument for making, tinkering and engineering should not be as an "alternative" way to learn, but what modern learning really looks like.
Planning
After establishing your vision, planning a makerspace should focus on three areas:
- Space design - Creating a floor plan, furniture, electricity, and storage.
- Tools and materials - What are we going to buy, repurpose, make, or make do without?
- Projects and logistics - What are students doing and when are they doing it?
These decisions should inform each other as planning moves through its paces. Ideas about tools will generate ideas for projects, ideas for projects will create ideas about timing and logistics and so on. Allow this iterative planning to become part of an annual cycle, where projects are reviewed and renewed, new favorite tools emerge, and as students gain skills, new goals and ideas are incorporated.
Space design
Thinking about the space and the furniture in it should start with a vision of the experience we want for the inhabitants. The maker movement is about openness, shared experiences, collaboration with people near and far, and moving quickly from ideas to real things. The space should reflect these ideals. The space should be as flexible as possible for all kinds of student work. Everything should be sturdy and easy to clean with visibility, good sight lines and natural lighting. Makerspace storage will be required for tools, materials, projects-in-progress and should be designed to accommodate future changes and growth.
- Areas for different kinds of work and equipment should be considered. For example, you may need to separate equipment that needs a cleaner environment from equipment like saws or a laser cutter that create dust.
- Furniture should serve multiple functions, for study, relaxation, conversations, and work. Look at chairs that roll, tables that change heights and storage that can be reconfigured as needs change.
- Review equipment plans for safety issues and space planning. Some equipment may require ventilation or have special installation specifications. Consider creating areas for higher risk equipment that is easy to monitor, or if that's not possible, able to be closed when necessary.
Space that is flexible, in addition to functional, supports creative work. Flexible doesn't just mean that it can be used for multiple purposes, but that it can also be controlled by the people using the space. Can your space support students who want to collaborate just as well as a student who needs to work alone? Can you create comfortable seating that works for brainstorming or reading a good book? Can you create "quiet zones" or a recording studio? When it's safe to do so, can students eat, drink or work with headphones even if that is not the usual school policy? Giving children choices about how they use this space will increase the creative potential of individual students.
In most cases, makerspace design and planning is a long-term group effort. Be sure to think through usability issues and make good notes about decisions so they are not just in one person's head. For example, if you are acquiring a 3D printer (or two or ten), they need to be attached to a computer and it's handy to have some tools nearby that help you work on 3D printed projects. Is there enough space next to the printer for computers plus some workspace? Are there enough electrical outlets? Do all these items need to be secured? Write down assumptions and options so you can make an informed review of these decisions as plans change - and they will.
If your space does double-duty, for example a makerspace that sometimes turns into a community meeting room, think about putting maker equipment and tools on wheeled carts that can be rolled in and out of closets as needed. This has an added advantage if one of the goals is to take maker equipment into other classrooms. Blackboard or whiteboard paint on walls and even desks and doors add even more creative possibilities.
Tools and materials
In our book, Invent To Learn: Making, Tinkering, and Engineering in the Classroom, these are the categories of things that should be in a makerspace:
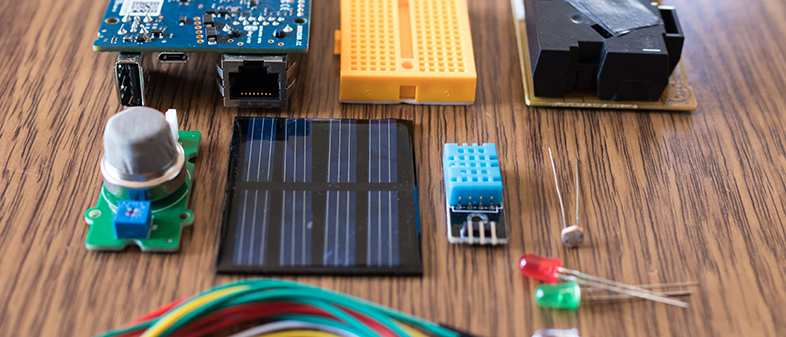
- Maker technology such as robotics, microcontrollers, 3D printers and more
- Electronic parts and tools
- Computers, cameras, software
- Craft and art supplies
- Building materials and traditional tools
- Junk for recycling into new products
- A library - don't forget books! Create a library that includes how-to books, project collections, computer books, and magazines like MAKE magazine. Books provide inspiration and a valuable place to go while thinking out a problem.
All of these things do not have to be acquired on day one. Be sure to leave room in your budget (and on your shelves) for a second phase of resources and replacing consumables.
If you are using things like LEGO, robotics or other limited hardware, you will usually have to set some rules about students claiming parts that other students need. Try to make sure you have a wide variety of parts available to start with. The answer to the question, "How much X do I need?" is that you need enough of X to allow every student to exceed the expectations of your assignment and keep their object together long enough for others to admire it. This may require teachers to vary the units of inquiry or stagger the sequence of projects to maximize the use of resources by all kids, classes and courses.
Choose materials for lasting value and creative potential with a good balance of high and low tech. If you have the funding, you will likely be looking at some fairly expensive purchases of futuristic technology like 3D printers. In most cases, you get what you pay for, but do your homework. There are many websites for educators with recommendations on maker technology. However, as with any cutting edge technology, things become obsolete quickly, or worse, never really work as advertised. Share the decision-making process with students, who will reward your trust with help on the details. Student leaders can be trusted allies and advocates who walk the talk of real-world STEM learning and student empowerment.
Include programming, computers, microcontrollers, fabrication technology, video production and high tech tools in your plans. These tools allow your makerspace to move beyond crafts. Computers add modern design, computational fluency, high tech troubleshooting and the ability to scale and grow with students. Students who master complex technology and software are empowered to do more. They learn to see themselves as problem solvers and citizens of the modern world. Don't let your own hesitation about technology prevent students from having these 21st century experiences.
Projects
The heart of making in education is the project. What will students do? How much will be open-ended and how much will be more predictable skill builders? This is an ongoing process of finding interesting challenges for students and helping them build skills needed to complete them. Projects can be connected to curriculum, actual class assignments or student choice. Whatever the source, these projects should not be set in stone, but change over time based on student ideas, new technology and teacher adjustments.
As you design your makerspace, you will have to make some assumptions about what kinds of projects the students will be working on. These plans will create the first cut at a tool, technology and material plan and budget, which should then be refined over time. It's a bit of a "chicken and egg" problem, where you don't know what technology to purchase if you don't have projects in mind, but you don't always have good ideas for projects if you don't know what technology you have to work with. It's best to keep some budget reserved as these issues become clearer over time, and your own best practices come into focus.
Logistics
Second only to the importance of "what" the students do is "when" they do it. Consider the effect on your makerspace plans for different student work schedules and numbers of students using the space per period and per day. Will a variety of classes visit the space for short work periods or will scheduled classes be held in the space? Will it be used for after-school clubs or be open to the community in the evenings? Will it be open during lunch or other unstructured time? Who will be in charge of the schedule? Who will be in charge of the materials, clean-up and keeping things working? There is no right answer or perfect plan, but someone has to be the point person.
Design for student agency and creativity
Planning a creative design space and stocking it with great materials and tools are only a part of shaping the learning environment. Creating an "intellectual design space" is another. Your students need to believe that they can be inventors and creators. Materials, tools and resources are crucial, but the educator's job is to keep the spirit and mood of the space conducive to creativity.
Once you have decided what kinds of equipment you will begin with, find ways for students to access that equipment that balances safety and security with creativity and a sense of ownership. Seize any opportunity to turn responsibility for design, decoration and space planning over to students. Weave brainstorming and project documentation into the space.
Building inclusive makerspaces
Every makerspace should be aware of their capacity to serve all people: children and adults, all genders, all backgrounds, those who are interested in the arts, engineering or both. To create inclusive experiences in schools educators should consider these factors:
- Look for culturally responsive, situated and relevant projects. Seeing cultural practices in a maker light can open doors and blur the lines between teachers and learners and invite community and parents in to participate.
- Be sensitive to gendered surroundings. Research shows that girls react to surroundings that reflect stereotypical "hacker" culture by denying that they are interested in science and engineering. If you aren't sure what vibe your classroom or makerspace is communicating, ask some kids.
- Reduce competition. Both overt contests and more subtle competition, like competition caused by a lack of adequate materials and tools, can reduce participation of girls. It can also be a barrier for beginners and students who don't see themselves as "technical." The competition aspect raises the stakes to a level that is too risky for students to jump in and try something they may actually enjoy.
- Don't advantage one kind of building over another. Robots are cool, but the same technologies of micro-controllers, sensors, motors and lights could make smart clothes, a useful invention for an elderly aunt, or better still, something no one has thought of before. Provide incentives, multiple on-ramps, praise and glory for all kinds of making.
I need to spend a lot of money?
No one should be prevented from having a great hands-on learning experience because of lack of funds. There are lots of things that can be repurposed and borrowed. In fact, recycling is a hallmark of the "maker mindset." Doing more with less is a worthy engineering constraint that develops ingenuity and practical skills.
However, when educators are trying to change culture and practices in an organization, it matters that you acknowledge the size of the shift you are trying to accomplish. A bigger shift requires a bigger and more explicit commitment and having a budget is a visible and commonly understood sign of commitment.
You want big changes? Do big things.
Proving it works starts today
Many schools embark on a makerspace project with all the best intentions, feeling intuitively that deep and meaningful experiences can only be good for students. However, there are always competing ideas about what this will mean. There is a good chance at some point in time, someone will say, "How do you know this works?"
Having an answer to that question should start immediately. As you plan the space, document the story of the design, build, and completion. Once you are done, collect stories, video of students talking and working and ask them how the makerspace supports their learning. Collect data on what parents want and then ask them three months later if it's happening. Creating a compelling success story doesn't happen by magic!
With thoughtful design and execution, your makerspace can be a place where vision becomes reality for years to come. Makerspaces are about empowering people, all people, to experiment with ways to make sense of the world, to make the world a better places and to make meaning in their lives.
Bio:
Sylvia Martinez is a maker, mom, engineer, and the co-author of the book, Invent To Learn: Making, Tinkering, and Engineering in the Classroom, called "the bible of the classroom maker movement." Sylvia speaks to and works with schools around the world evangelizing authentic, inclusive use of technology across the curriculum. She is president of Constructing Modern Knowledge Press, creating books and professional development advocating using modern technology for learning. Sylvia is also the principal advisor to the NSF-funded FabLearn Fellows program at Stanford University. Prior to that, Sylvia ran the educational non-profit Generation YES, designed and programmed educational software and video games, and was an aerospace engineer specializing in GPS navigation and high frequency receiver systems.
Additional resources
- Invent To Learn: Making, Tinkering, and Education in the Classroom - Books, links, resources, and professional development for making in the classroom. http://www.inventtolearn.com
- Sylvia Martinez - The website of Sylvia Martinez http://sylviamartinez.com
- Constructing Modern Knowledge - the premier event for summer teacher professional learning with the tools and materials of the 21st century. http://www.constructingmodernknowledge.com
- Educators interested in designing productive learning environments need to have The Language of School Design: Design Patterns for 21st Century Schools by Prakash Nair and Randall Fielding in their library. Examples of their learning design principles may be found at http://fieldingnair.com.